Difference between revisions of "Heatsinks"
(→Theory) |
|||
| Line 6: | Line 6: | ||
==Theory== | ==Theory== | ||
===Poor TO-220 Heatsinking=== | ===Poor TO-220 Heatsinking=== | ||
| + | I repaired an audiophile power supply, with loose to-220's underneath the board. They were loosely hanging over a sil pad and then not really making contact with the bottom of the chassis. This is of course, the wrong way to heatsink TO-220's. Given that the majority of the power was to go through these transistors, this was a bad design choice. While there are stand up heatsinks, which you see most of the time, there are also board mount heatsinks, where you will bend the TO-220 90 degrees, and then screw it into a heatsink, and into the board (optionally with sil pad). See the photos. | ||
<gallery> | <gallery> | ||
File:Boardmount heatsink.jpg|These heatsinks can have the TO-220 bended on them, and the heatsink bolted to the board. It's also possible to get a top cover for these (a separate piece of metal, or connected to the original as a type of clamp). Some of these, will apply a bit of pressure (on the top half) to make good contact. Essentially sandwiching the case to the heatsink. | File:Boardmount heatsink.jpg|These heatsinks can have the TO-220 bended on them, and the heatsink bolted to the board. It's also possible to get a top cover for these (a separate piece of metal, or connected to the original as a type of clamp). Some of these, will apply a bit of pressure (on the top half) to make good contact. Essentially sandwiching the case to the heatsink. | ||
| Line 11: | Line 12: | ||
File:Boardmount heatsink2.jpg|Here is an example of the clamping type of heatsink, though there are others where the two pieces are separate. | File:Boardmount heatsink2.jpg|Here is an example of the clamping type of heatsink, though there are others where the two pieces are separate. | ||
</gallery> | </gallery> | ||
| − | |||
==Tips/Techniques== | ==Tips/Techniques== | ||
Revision as of 06:22, 11 August 2026
Heatsinks are easily reused components. They are also easy to DIY, if you have a mill.
List
- https://www.eevblog.com/forum/projects/heatsink-for-power-so8-package/msg5763881/?topicseen#msg5763881 Interesting piece of sheet metal bonded to a power so8 package. Maybe it's using thermal glue.
Theory
Poor TO-220 Heatsinking
I repaired an audiophile power supply, with loose to-220's underneath the board. They were loosely hanging over a sil pad and then not really making contact with the bottom of the chassis. This is of course, the wrong way to heatsink TO-220's. Given that the majority of the power was to go through these transistors, this was a bad design choice. While there are stand up heatsinks, which you see most of the time, there are also board mount heatsinks, where you will bend the TO-220 90 degrees, and then screw it into a heatsink, and into the board (optionally with sil pad). See the photos.
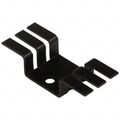
These heatsinks can have the TO-220 bended on them, and the heatsink bolted to the board. It's also possible to get a top cover for these (a separate piece of metal, or connected to the original as a type of clamp). Some of these, will apply a bit of pressure (on the top half) to make good contact. Essentially sandwiching the case to the heatsink.

Loose TO-220's. What isn't shown here is how the chassis was essentially supposed to make contact with these by virtue of them being 'sort of close'. Because there was no screw or bolt to hold them in, they were hanging and had an air gap.
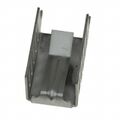
Here is an example of the clamping type of heatsink, though there are others where the two pieces are separate.


Tips/Techniques
Submerging a PCB in Oil As a Heatsink

RPi Running in Oil.

I have seen this at an expo. I've already fried (no pun intended) an RPI by not paying attention to ESD though, so I don't want to inadvertently break one by putting it in an oil bath.

