Difference between revisions of "Optiboot"
From Steak Wiki
Jump to navigationJump to search| (7 intermediate revisions by the same user not shown) | |||
| Line 7: | Line 7: | ||
* need lock bits set | * need lock bits set | ||
* need 16MHz crystal when programming hex and lock bits (can use one from uno board) | * need 16MHz crystal when programming hex and lock bits (can use one from uno board) | ||
| + | * avrdragon needs disconnect / reconnect | ||
==quick guide:== | ==quick guide:== | ||
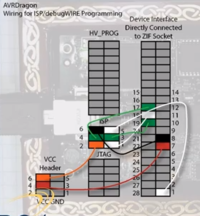
| − | set proper wiring on avr dragon (see image | + | set proper wiring on avr dragon (see image on right) |
| + | [[File:Avrdragon_atmega328p_programming.png|200px|thumb|right|jumpers for breakouts on avr dragon. borrowed from elsewhere.]] | ||
set fuse bits | set fuse bits | ||
avrdude -b 19200 -c dragon_isp -p m328p -v -e -U efuse:w:0xFD:m -U hfuse:w:0xDE:m -U lfuse:w:0xFF:m | avrdude -b 19200 -c dragon_isp -p m328p -v -e -U efuse:w:0xFD:m -U hfuse:w:0xDE:m -U lfuse:w:0xFF:m | ||
| Line 19: | Line 21: | ||
''arduino-1.8.5/hardware/arduino/avr/bootloaders/optiboot_atmega328.hex'' | ''arduino-1.8.5/hardware/arduino/avr/bootloaders/optiboot_atmega328.hex'' | ||
| − | If everything is done correctly, you should be able to upload from Arduino IDE. | + | If everything is done correctly, you should now be able to upload from Arduino IDE. |
==tips/troubleshooting== | ==tips/troubleshooting== | ||
| Line 27: | Line 29: | ||
* atmega328 (not atmega328p), use -F with avrdragon. | * atmega328 (not atmega328p), use -F with avrdragon. | ||
* board.txt somewhere in arduino folder also has proper fuse settings (search for uno) | * board.txt somewhere in arduino folder also has proper fuse settings (search for uno) | ||
| + | * first breakout on dragon is gnd/vcc header. Obviously, multiple of these can be used. | ||
| + | * if it errors out, disconnect / reconnect dragon. e.g. | ||
| + | <pre>avrdude: usbdev_open(): Found AVRDRAGON, serno: 00######### | ||
| + | avrdude: jtagmkII_getsync(): sign-on command: status -1</pre> | ||
==References== | ==References== | ||
Latest revision as of 03:15, 13 July 2020
Guide for AVRDragon, atmega328p, and optiboot bootloader.
gotchas:
- wrong atmega328 (need atmega328p-pu, not atmega328-pu) (though this can still be used)
- need fuse bits set separate from programming hex (pickit w/pics on the other hand handle this all in one)
- need lock bits set
- need 16MHz crystal when programming hex and lock bits (can use one from uno board)
- avrdragon needs disconnect / reconnect
quick guide:
set proper wiring on avr dragon (see image on right)
set fuse bits
avrdude -b 19200 -c dragon_isp -p m328p -v -e -U efuse:w:0xFD:m -U hfuse:w:0xDE:m -U lfuse:w:0xFF:m
add crystal (pins 9 and 10 on atmega328p, see datasheet) , load hex, and program lock fuse
avrdude -b 19200 -c dragon_isp -p m328p -v -e -U flash:w:hexfilename.hex -U lock:w:0x0F:m
hexfilename.hex - the optiboot loader is included in e.g. arduino-1.8.5/hardware/arduino/avr/bootloaders/optiboot_atmega328.hex
If everything is done correctly, you should now be able to upload from Arduino IDE.
tips/troubleshooting
- use another Uno's crystal if you don't have one on hand. Solder wires and jump to dragon ziff socket.
- efuse verifies as 0xFD, though some guides write 0x05. High bits are unused, so they are set to 1. Ends up as 0xFD if written with either 0xFD or 0x05.
- atmega328 (not atmega328p), use -F with avrdragon.
- board.txt somewhere in arduino folder also has proper fuse settings (search for uno)
- first breakout on dragon is gnd/vcc header. Obviously, multiple of these can be used.
- if it errors out, disconnect / reconnect dragon. e.g.
avrdude: usbdev_open(): Found AVRDRAGON, serno: 00#########
avrdude: jtagmkII_getsync(): sign-on command: status -1
References
- https://forum.arduino.cc/index.php?topic=125622.0 - where is optiboot hex file in arduino download folder
- https://learn.sparkfun.com/tutorials/installing-an-arduino-bootloader - fuse and lock bit information (seems to be incorrect)
- http://www.martyncurrey.com/arduino-atmega-328p-fuse-settings/ - general info on atmega328p fuse settings.
